Thanks for all the input.
I've taken some pics and will upload them soon.
Here's what I think: Now, let me get my excuses in first! You have to remember that this is my first attempt at an amp build. Also, the chap I roped into helping me on this, whilst highly qualified, has no experience of tube driven 50s technology.
The only documentation supplied by Mojotone was a schematic (with certain things missing from it - the negative feedback loop for example) and a layout which, as far as I can make out, replicates the original Fender layout doc. Further, although Mojotone supplied the correct PT with export taps (I'm in England) they included the pin out info for the US PT - they sent us the correct doc as soon as I contacted them, and apologised, but it threw us a bit.
The upshot of our inexperience is that I don't think we've paid enough attention to the things mentioned above - grounding scheme, routing, twisting wires together, etc. You'll see what I mean when I post the pics. Don't be too hard on us - the amp sounds great, it just hums a bit!
Regards,
Retiarius
1st Champ build newbie help request
Moderators: pompeiisneaks, Colossal

Re: 1st Champ build newbie help request
No excuses allowed !!! 
Hey, just kidding. We are all here to learn from each other, and when we are comfortable with a topic, to try to help others. I've built about dozen amps, and in many ways, still consider myself to be a complete beginner. I learn something every time I come here, and hopefully you will too. You are in good company, so ask your questions without concern of ridicule.
And if anyone does ridicule you, tell them to go f*#$ themselves
Looking forward to seeing your photos.
Re: 1st Champ build newbie help request
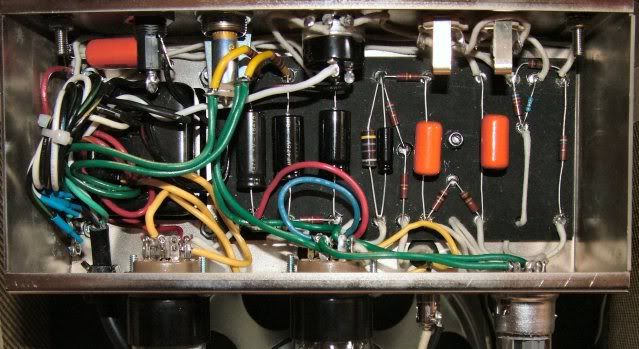
Ok - I hope the links to the pics will appear.
The dodgy resistor on the input, by the way, is a temporary thing as the kit included one at the wrong value.
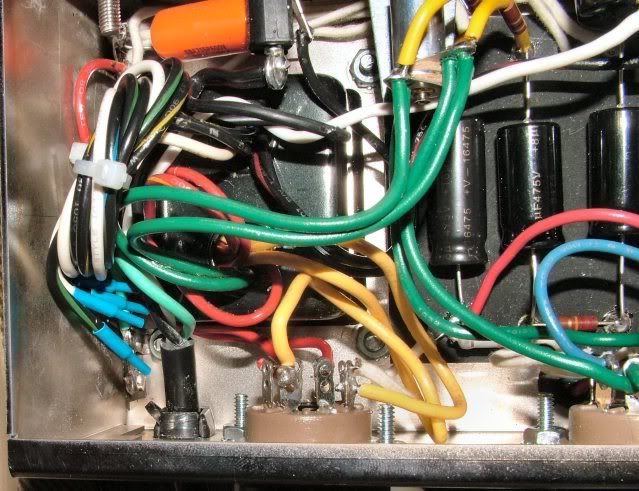
We didn't know what to do with the unused PT wires, so we heat shrank them and coiled them, as you can see.
http://i96.photobucket.com/albums/l165/ ... CF4512.jpg
http://i96.photobucket.com/albums/l165/ ... CF4515.jpg
http://i96.photobucket.com/albums/l165/ ... CF4516.jpg
http://i96.photobucket.com/albums/l165/ ... CF4517.jpg
Regards,
Retiarius
The dodgy resistor on the input, by the way, is a temporary thing as the kit included one at the wrong value.
We didn't know what to do with the unused PT wires, so we heat shrank them and coiled them, as you can see.
http://i96.photobucket.com/albums/l165/ ... CF4512.jpg
http://i96.photobucket.com/albums/l165/ ... CF4515.jpg
http://i96.photobucket.com/albums/l165/ ... CF4516.jpg
http://i96.photobucket.com/albums/l165/ ... CF4517.jpg
Regards,
Retiarius
Re: 1st Champ build newbie help request
I took the liberty to make the images to appear.Retiarius wrote:Ok - I hope the links to the pics will appear.
The dodgy resistor on the input, by the way, is a temporary thing as the kit included one at the wrong value.
We didn't know what to do with the unused PT wires, so we heat shrank them and coiled them, as you can see.
[img:639:349]http://i96.photobucket.com/albums/l165/ ... CF4512.jpg[/img]
[img:639:334]http://i96.photobucket.com/albums/l165/ ... CF4515.jpg[/img]
[img:639:491]http://i96.photobucket.com/albums/l165/ ... CF4516.jpg[/img]
[img:638:351]http://i96.photobucket.com/albums/l165/ ... CF4517.jpg[/img]
Regards,
Retiarius
You simply highlight the link then hit the img button.
Tom
Don't let that smoke out!
Don't let that smoke out!
Re: 1st Champ build newbie help request
The thing that jumps out for me is the lead dress.
The heater wires should be twisted fairly tight, then ran to each tube.
The lead dress for the power transformer is also sloppy.
Trim down the lengths of all those wires.
If you have any AC carrying wires and they go near a wire that is carrying signal, the hum or noise will be amplified along with the signal.
On the wires for V1, run the plate wires (pins 1 & 6) flat to the chassis, run the grids above them and if the have to cross, do it at a 90 degree angle.
Double check all your solder joints.
A good joint is smooth and shiny.
So if any look suspect, tin your iron and add just a bit of solder and re-flow the connections on the eyelets and component lugs.
Last edited by Structo on Thu Apr 02, 2009 2:45 pm, edited 1 time in total.
Tom
Don't let that smoke out!
Don't let that smoke out!
Re: 1st Champ build newbie help request
OK, I only took a quick look so far, but here are some things I woudl suggest.
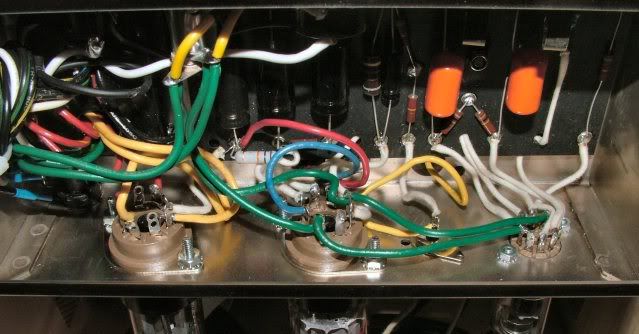
I usually, twist together power supply wires in pairs. For example, the high voltage pair of wires coming from your PT would be twisted tightly together, and the 5V wires headed for the rectifier would be twisted, and the green heater wires would be twisted.
Also, with regard to the heaters, since you have to "extend" them to reach each of the tubes, these extensions should also be twisted.
Now, at your power tube, I also noticed that the wires go both above and below the socket. Generally you don't want to surround the tube socket with your heater wires. you want to have them confined to one side of the socket. I attached a photo of an Express (it was handy) that shows what I mean.
At the preamp tube, your heater wires cut right across the bottom of the socket. I usually run the wires around the circumference of the tube instead, but again, confining it to only one side to avoid surrounding the socket.
As for the unused transformer wires, it is always a dilema. On the one hand, if you trim them down and shrink wrap the ends, you get a neater and possibly quieter build. On the other hand, you make it much harder to reuse that transformer for a different project. In this case, since the trannies are small and won't be useful for amps that are significantly different from the Champ, I would suggest trimming them and not worrying about reuse.
If any of this is not clear, just ask.
Later on, I'll look further to see if anything else comes to mind.
Steve
You do not have the required permissions to view the files attached to this post.
Re: 1st Champ build newbie help request
I didn't have much luck finding a good picture of a 5F1 gut shot.
But look carefully at this one.
Notice the twisted wires.
But look carefully at this one.
Notice the twisted wires.
You do not have the required permissions to view the files attached to this post.
Tom
Don't let that smoke out!
Don't let that smoke out!
Re: 1st Champ build newbie help request
Lead dress is going to be a good part of your problem, but it's not difficult to rectify in a small amp like this. The photo Structo posted is a good example but you'll notice that even on that one they've added some screened cable, presumably because of some noise issues.
One thing that does concern me is the cap from the fuseholder, presumably to the chassis.
How have you got your mains wired, from all three conductors coming in, right up to the transformer?
The reason I ask is because you're using a US rather than a UK mains cable, so it doesn't necessarily follow that you'll have live (hot) and neutral (cold) round the right way. That could mean that the only thing separating the chassis from 240V is that cap, which should be a class Y for that application, but appears to be a hangover from the days of two pin sockets in the US when they needed these. You shouldn't have it in there, and the earth wire should be connected directly to the chassis on its own ground point.
Paul
Re: 1st Champ build newbie help request
Thanks guys, for all your comments.
I shall re-wire and re-route to address the issues you have highlighted - the photos you've posted are very helpful. I just didn't realise the importance of wire dressing at the time. During this build I've looked at this forum a lot as well as reading and re-reading books such as The Tube Amp Handbook and others (I'm minded to try the Two Stroke amp included in it as my next build as it has step by step instructions). I know more now (a little) than I did then.
paulster - if I remember rightly yes, we have all three conductors from the mains wired to the transformer. That was done by my mate while I wasn't there during the confusion surrounding the US/UK wiring documentation (convenient isn't it - I can just shift the blame!). We put that cap in because it was on the layout.
You're saying it's dangerous right? And, when you say "...the earth wire should be connected directly to the chassis on its own ground point...", you mean the earth wire from the fuse holder? I'm too young to die!
Thanks again to all.
Regards,
Retiarius

Re: 1st Champ build newbie help request
For mains power supply wiring, look here:
http://www.netads.com/~meo/Guitar/Amps/ ... /safe.html
Of course this is USA standard Green to ground, White is neutral, Black is hot. I believe Euro standard is Brown to hot, Blue to neutral, and Green/Yellow to ground. The ground wire (Green or Green/Yellow) should be terminated with a ring lug (not an open lug) and connected with a bolt that goes through the chassis. Use a toothed washer to help it lock tight, and solder it if you are able, but that takes a great deal of heat. The ground bolt should be used only for that one ring lug and no other purpose. Locate as close to the chassis entry point as possible.
Loose the cap; it is something that appears because it represents an antiquated practice that is no longer consider safe, but has historical accuracy. In the bad old days in the US, there was no standard for which side of the 2-prong mains outlet was hot and plugs would work in either orientation. Those days are long gone.
Re: 1st Champ build newbie help request
Phil - your Euro knowledge is spot on, and I'd agree 100% with all of your other statements.
The neutral wire should go directly to the transformer in the absence of a double-pole mains switch.
The live wire should go directly to the fuseholder, to the terminal on the end of it (furthest from prying fingers) and then a wire from the side terminal on the fuseholder should go to the power switch and from there to the transformer.
The earth wire should be wired exactly as Phil described it. And technically it should be the longest wire, so that if the power cord is yanked out of the chassis, the earth will remain connected whilst the live and neutral are ripped out first, ensuring you're still protected.
And the cap should disappear. It's not needed in an earthed environment and even if it was, that's not a suitable type of cap for this application.
The great thing with the Champ is that there's nothing in there that'll take too long to put right.
Filament wiring
Hello!
Congratulations on your first build! I agree with the great advise of the previous posters. I've built many small sized amps. The tweed Champ is one that I like to change the filament wiring on. I like to make the filament wiring like the silverface models. I first twist the green transformer wires, and attach them to the pilot lamp socket. Then I twist two sets of wires one for the power tube and the other for the preamp tube and hook them up. I also DO NOT ground one of the green wires like it is shown on the schematic. Instead IF there is a green/yellow wire on the transformer (Filament Center Tap) I ground it. If there is no green/yellow wire, I then use two 100 ohm resistors mounted on the pilot lamp socket, one resistor from one green wire to chassis ground and the second resistor from the other green wire to ground. This makes the amp lots quieter.
Congratulations on your first build! I agree with the great advise of the previous posters. I've built many small sized amps. The tweed Champ is one that I like to change the filament wiring on. I like to make the filament wiring like the silverface models. I first twist the green transformer wires, and attach them to the pilot lamp socket. Then I twist two sets of wires one for the power tube and the other for the preamp tube and hook them up. I also DO NOT ground one of the green wires like it is shown on the schematic. Instead IF there is a green/yellow wire on the transformer (Filament Center Tap) I ground it. If there is no green/yellow wire, I then use two 100 ohm resistors mounted on the pilot lamp socket, one resistor from one green wire to chassis ground and the second resistor from the other green wire to ground. This makes the amp lots quieter.
Re: 1st Champ build newbie help request
Stubby is right on with his advice..The other thing you can do is DC elevation of the heater circuit...Take the 100 ohm resistors back to the cathode of the power tube. Trying to think where you can see an example of that but my mind has gone blank. (happens when you get old)