I was wondering if some of you that make your own PCB's could pass along some tips in construction of them.
I'm interested in the Presensitized and photo emulsion method using a transparent mask for the trace pattern.
I'm from the old days when we used to markup the blank copper clad board then etch it.
So using the newer technology has me interested in trying this again.
Mainly for the power supply and supply filter board for an ODS.
Can you print those out on a transparency with a inkjet printer?
The only presensitized stock I have seen is the 1/16" 1 oz. copper board, is that heavy duty enough?
I seem to remember back when we would draw the pattern on the board that the 2 oz. copper was recommended and it seems like the board was thicker than 1/16", like 3/32" or even 1/8".
It also seems if I recall if you didn't use the right thing to draw the circuit the acid would eat the traces away too much if you didn't watch it.
As far as etchant goes I think I have that covered with muriatic acid and hydrogen peroxide.
Thanks,
Tom
PCB Making and Advice
Moderators: pompeiisneaks, Colossal
PCB Making and Advice
Tom
Don't let that smoke out!
Don't let that smoke out!
-
tele caster
- Posts: 189
- Joined: Sat May 24, 2008 5:17 pm
Re: PCB Making and Advice
An inkjet wont work. You need the toner in a laser printer. I use transparency as well.

Re: PCB Making and Advice
Tom we were talking about Radio Shack.
I had to run over to a different Radio Shack store today not my usual store and they had three bottles of etchant on the shelf, funny how some stores don't carry this stuff. The regular store had two.
Picked up three 12v transformers when I was there.
I had to run over to a different Radio Shack store today not my usual store and they had three bottles of etchant on the shelf, funny how some stores don't carry this stuff. The regular store had two.
Picked up three 12v transformers when I was there.
-
Sonny ReVerb

- Posts: 342
- Joined: Sun Feb 05, 2006 6:54 pm
Re: PCB Making and Advice
Yeah, a laser printer is required. I've got a stash of PnP Blue, but if I was starting from scratch I'd try the glossy (magazine) paper method. Can't beat the price.
http://www.riccibitti.com/pcb/pcb.htm
http://www.riccibitti.com/pcb/pcb.htm
"The blues is the roots, the rest is the fruits." - Willie Dixon
Re: PCB Making and Advice
Hello,
You could take your art work to a copy place and have them photocopy it onto a transparency. I usually make a sandwich of two copies of my art as my printer isn't working like it used to.
Digikey does have 2oz presensitized copper PCB's if that what you're after. I've used those as well as the usual 1oz boards and haven't had any issues with either.
You can find trace width calculators on the web that will tell you for a given weight of copper how wide your traces need to be and their seperation for your target voltages and current. Here's one such calculator. http://www.desmith.com/NMdS/Electronics/TraceWidth.html
The muriatic acid/hydrogen peroxide works well however i've never had any real success regenerating it so i'll only mix up the minimum amount i need to cover the board that way when it dies i only loose a small amount.
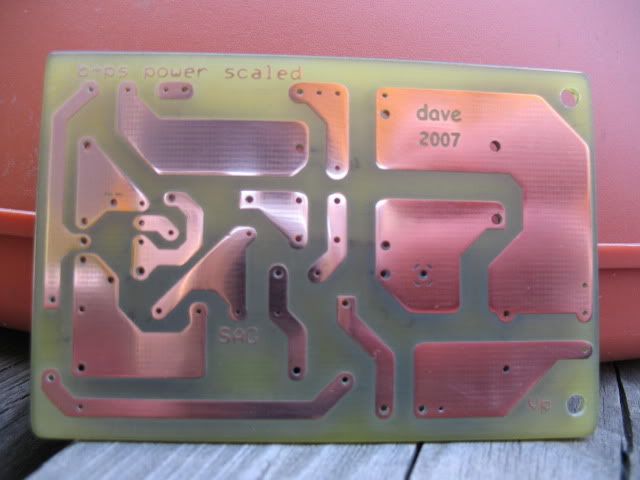
2oz copper.
[IMG:640:480]http://i216.photobucket.com/albums/cc30 ... G_0322.jpg[/img]
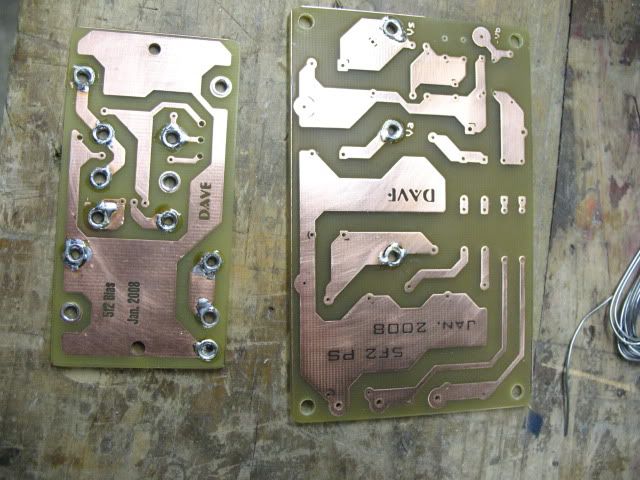
1oz cooper
[IMG:640:480]http://i216.photobucket.com/albums/cc30 ... G_0779.jpg[/img]
I just use ExpressPCB to do the layouts, free and real easy to learn.
take care
dave
You could take your art work to a copy place and have them photocopy it onto a transparency. I usually make a sandwich of two copies of my art as my printer isn't working like it used to.
Digikey does have 2oz presensitized copper PCB's if that what you're after. I've used those as well as the usual 1oz boards and haven't had any issues with either.
You can find trace width calculators on the web that will tell you for a given weight of copper how wide your traces need to be and their seperation for your target voltages and current. Here's one such calculator. http://www.desmith.com/NMdS/Electronics/TraceWidth.html
The muriatic acid/hydrogen peroxide works well however i've never had any real success regenerating it so i'll only mix up the minimum amount i need to cover the board that way when it dies i only loose a small amount.
2oz copper.
[IMG:640:480]http://i216.photobucket.com/albums/cc30 ... G_0322.jpg[/img]
1oz cooper
[IMG:640:480]http://i216.photobucket.com/albums/cc30 ... G_0779.jpg[/img]
I just use ExpressPCB to do the layouts, free and real easy to learn.
take care
dave

Re: PCB Making and Advice
Those are beautiful PCBs, Dave!
I build and repair tube amps. http://amps.monkeymatic.com

Re: PCB Making and Advice
if you have a radio shack or fry's electronics near by they still sell PCB making kits. I don't know how big the boards are in the kit, but if you need a larger kit, there are hobby stores that sell large kits.
wasn't there a really great thread on making dumble boards last summer?
mcracer?
wasn't there a really great thread on making dumble boards last summer?
mcracer?
My Daughter Build Stone Henge
-
Cliff Schecht
- Posts: 2629
- Joined: Wed Dec 30, 2009 7:32 am
- Location: Austin
- Contact:
Re: PCB Making and Advice
I've etched a LOT of boards over about the past 7 years, I'm sure the number is upwards of 100 by now (for others too, not just for personal stuff). I'm prescribed to the PnP blue method which, when paired with clean copper clad board and good ironing technique, makes some fantastic etch-ready boards. That stuff is all about technique though and you have to mess up quite a few boards before you start really getting the process down. If I'm all setup, I can have a board or batch of boards cranked out in about 30 minutes.
As far as actually etching is concerned, go ferric chloride. It's not that expensive and a bottle from Radio Shack will last you a long time. It's reusable for a good while as well. It's a somewhat nasty chemical though and will eat through a lot of stuff, ruin clothes and stain your skin. That's easy to take care of by having some nitrite gloves (cheap from Harbor Freight) and an etch tank. Heating the ferric chloride and agitating it (a bubbler works well) will make the board etching time go from 5-10 minutes to about 30 seconds.
As far as actually etching is concerned, go ferric chloride. It's not that expensive and a bottle from Radio Shack will last you a long time. It's reusable for a good while as well. It's a somewhat nasty chemical though and will eat through a lot of stuff, ruin clothes and stain your skin. That's easy to take care of by having some nitrite gloves (cheap from Harbor Freight) and an etch tank. Heating the ferric chloride and agitating it (a bubbler works well) will make the board etching time go from 5-10 minutes to about 30 seconds.
Cliff Schecht - Circuit P.I.

Re: PCB Making and Advice
I do prototype / one-off circuits all the time, and have beeen for over 30yrs now.
I have never used the PnP Blue stuff, but from what I've read it's ok. We use another product called Laser Star, which is very much like the old plastic drafting film we used back in the 70s - seems sort of semi transparent like "baking paper" ( just forgot the US name for it). I'll post a US link if I find one. Works extremely good, even for very fine lines in crammed digital boards. Some laser printers don't produce enough contrast on a single transparency film, so often two printouts, aligned and taped together works better.
The other thing is to have even lighting in the copy process - for smaller boards 2-3 fluorescent tubes spaced 2-3 inches works very good, and is of course the way our copy boxes are made, although double sided and with a lot more tubes, timers, vacuum etc. The special tubes ought to be noe more than 20-30$ each US side....
I have not checked all the US producs available, but the chemicals needed are more or less household stuff - most developers are sodium hydroxide at 20 grams pr. litre - or roughly 18 g pr quart.
Ferric chloride and sodium peroxide ( or ammonium peroxide) are the two most common commercial etchants. I also use the Muriatic acid / hydrogen peroxide mix, when our machines are down for some reason or another. Works quite well, but I've always treated it as a "throw away mix" after use. The trick is to have a mix which is not tpp strong nor to weak, to have an acceptable etchng time - appx 1 min.
Both the ferric choride ant the peroxide mixes should preferrably be heated to appx 45-50 deg C and at best sprayed on , but injecting air works quite well - even an aquarium pump and a diffusor is really enough for small scale work.
Re: PCB Making and Advice
Thanks guys.
I wonder if a HP scanner would work to expose the film on the presensitized boards?
Those have pretty bright cold cathode tube lights in them.
@ davent,
Those are some really nice looking boards and the 2 oz. board is noticeably more heavy duty looking.
A couple years ago when I was getting into making relic parts for guitars I needed some etchant and went to four of the possible 8 Radio Shack stores in my town, nobody had any and at the last store I had the manager cal the stores I hadn't visited.
Nobody had any.
And, nobody could tell me why they didn't have any.
I think I came home and Googled it and that is when I found out that they were not shipping it to the stores anymore.
Now I haven't checked in a while and don't know if it is just my state that doesn't carry it.
Tom
Don't let that smoke out!
Don't let that smoke out!
-
sixstringer
- Posts: 186
- Joined: Wed Feb 03, 2010 11:13 am
- Location: SoCal
Re: PCB Making and Advice
I’ve made dozens of PCBs using the ExpressPCB -Laser printer/ PnP blue - Radio Shack style etchant process and have had outstanding results. It takes high heat (like the “cotton” setting on an iron) and a few minutes to make a good transfer of the Laser ink on to the PnP blue material. Placing the PCB material on metal plate helps retain more heat and it goes little faster. The etchant works faster if you keep it warm, I warm it before use in a hot water bath and keep it warm by placing a 100w light bulb close to the tray. I made a little rig using a Lego toy electric motor to rock the tray and agitate the etchant so I can leave it while it does it's thing.
I’ve been buying etchant in powder form from All Electronics: http://www.allelectronics.com/index.php ... t&x=17&y=8
and mixing it in a plastic jug used for darkroom chemicals from the photo store. It keeps for months.
I’ve been buying etchant in powder form from All Electronics: http://www.allelectronics.com/index.php ... t&x=17&y=8
and mixing it in a plastic jug used for darkroom chemicals from the photo store. It keeps for months.
Re: PCB Making and Advice
I'm not sure a scanner light source is enough or even the right colour. The presisitized boards are usually optimized for a light colour of around 380 nm. Special tubes are available , but black light bulbes and tubes also work. The contact copy boxes I use, with 8 tubes over and under, gives around 2-2.5 min of exposure. Just make a test strip with 30 sec intervals.....
Re: PCB Making and Advice
Is there any way to tell when you have exposed the board to light long enough?
Does the overlay change color or anything?
Also, do you use a transparency with the copper traces made with the black ink of a laser printer?
In other words, you don't have to reverse or flip the image do you?
So if I made a transparency of the Dumble power supply board with the black ink where the copper traces are, is that the way you do it?
Tom
Don't let that smoke out!
Don't let that smoke out!
Re: PCB Making and Advice
Most of the precoated boards in the market today are positives , meaning your printout should be coated where you want the copper to go.
Flippin' the image in order to put the transparency coating as close to the board is customary for precision work and line widths around 0.03" and less, - otherwise the parallax of the film thickness can give a slightly blurred edge, but for larger coated areas as the Dumble PCB published here, it doesn't do much of a difference. Depends slightly on which light source you have.
Exposure time is hard to tell without actually measuring the light output of the source. A light box with 15W tubes will usually give somewhere around 2-3 mins. Mix the developer as pr instructions. Make a test strip as suggested in 30 sec intervals, say from 1m30s up 3-4 mins. Normal developing time should be listed with the instrucions - Around 2 mins should be OK. The inspect the edges with a magnifier. The lighted areas changes hue somewhat if you look at it, so you should be able to see the pattern before devepoling. The lighted, or free areas, should release the coating fairly quickly with clean edges.
Etch for the prescribed time and inspect again. You should have clean, sharp edges and no "patching" in the filled areas. Making a few test lines of appx 0.03" can give a good indication of developing and etching quality.
Re: PCB Making and Advice
I just saw this at AES and wondered if anyone had an experience with it
http://www.tubesandmore.com/scripts/fox ... =S-CCW100P
http://www.tubesandmore.com/scripts/fox ... =S-CCW100P