
Looking for a technique to install a few extra eyelets in a Dlite main board without removing the board from the chassis. I imagine that drilling out the holes is simple enough, and then pushing the eyelet into the hole. Is there a special tool devised to crimp the underside of the eyelet in place.
ange
Installing eyelets w/ board in chassis
Moderators: pompeiisneaks, Colossal
Re: Installing eyelets w/ board in chassis
Nope - you're better off to pull the board out and add a few extra eyelets. It won't take long to de-solder everything and then put it back later. If you attempt to take a shortcut, you'll surely be more likely to mangle up something and cause a short somewhere.
Another idea might be to add a smaller sub-board with the eyelets in it that you need (if you can't be fagged pulling out the main board)
Another idea might be to add a smaller sub-board with the eyelets in it that you need (if you can't be fagged pulling out the main board)
Re: Installing eyelets w/ board in chassis
Do you really need the extra eyelets is another matter. Why not just hot glue the components onto the board and solder leads without the eyelets? Resistors of course may get a bit hot if they carry DC.
-
Andy Le Blanc
- Posts: 2582
- Joined: Sat Dec 22, 2007 1:16 am
- Location: central Maine
Re: Installing eyelets w/ board in chassis
put the eyelet in upside down, or the thought that grabbed me after a pm
was simply to scrounge a terminal stand off and mount it to the board or chassis.
was simply to scrounge a terminal stand off and mount it to the board or chassis.
lazymaryamps

Re: Installing eyelets w/ board in chassis
This was my reaction, as well. Figure out how to mount a terminal strip...super glue, silicone goo, epoxy come to mind. A #4 or #6 screw and bolt if you can manage is better. If you fix it with an adhesive, use something that does not soften too much when heated.Andy Le Blanc wrote:...was simply to scrounge a terminal stand off and mount it to the board or chassis.
Re: Installing eyelets w/ board in chassis
Thought experiment. I wonder if a #2 screw would fit through the eyelet? It might be possible to crimp it in using a flathead screw on the unformed side of the eyelet and a nut/washer on the formed side. Then go back with a panhead screw/washer to finish the job and tighten it up.
-
Andy Le Blanc
- Posts: 2582
- Joined: Sat Dec 22, 2007 1:16 am
- Location: central Maine
Re: Installing eyelets w/ board in chassis
thats not a bad thought, but the staking tool has a rounded surface to curl
the edge over against the board, simply flattening the back won't secure it.
the edge over against the board, simply flattening the back won't secure it.
lazymaryamps
-
Kagliostro

- Posts: 549
- Joined: Wed Dec 30, 2009 12:09 am
- Location: Italy
Re: Installing eyelets w/ board in chassis
+ 1 for xk49w idea
drill the hole
put the screw from the upper side
use the nut in the lower side
(I think you have not enough room to do it reversed)
you can modify a little the nut as it is conical in the side it see the eyelet (not very much conical, only a bit)
or you can find some brass screw, and use it as eyelets
if you have the ability to do it, you can also make a hole in the screw, or, easily, use + screw (philips screw) instead of - screws (normal carving screws)
Kagliostro

Re: Installing eyelets w/ board in chassis
I've created new nodes by drilling an 1/8" hole and using a pop rivet to attach a solder lug.
http://www.xtalman.com/lugs.JPG
http://www.xtalman.com/lugs.JPG
-
Sonny ReVerb

- Posts: 342
- Joined: Sun Feb 05, 2006 6:54 pm
Re: Installing eyelets w/ board in chassis
You could try one of those eyelet crimpers from a fabric/hobby store. They're like a pair of pliers that squeeze the eyelet from both sides. If you could drill the hole, put in the eyelet, and just tip the board to get the crimpers on it, it may work. They don't have much of a throat, so the eyelet would have to be near the edge of the board in order to reach it. Here's an example.
"The blues is the roots, the rest is the fruits." - Willie Dixon
Re: Installing eyelets w/ board in chassis
That is a great idea Sonny.
You could just loosen the board and tip it enough to get those crimpers in.
Looks like Target carries that and it comes with 50 eyelets.
I wonder if they are brass or aluminum?
Also, I wonder how far of a reach it has for crimping eyelets more towards the middle of the board.
I have tried the hot glue method when I have added the odd resistor.
But it can let loose if it gets hot enough.
Ange, as mentioned, it's not that hard to pull the wires then the board.
At the same time you can fix any lead dress issues or neaten up the wiring.
This is to install a balance trimmer on the PI.
The payoff on doing this mod may not be that immense but it is one of those things that is cumulative to a great sounding amp.
I wish Brown Note had followed the #124 layout on these amps.
Would have made modifying them a lot easier.
Tom
Don't let that smoke out!
Don't let that smoke out!

Re: Installing eyelets w/ board in chassis
trick one of the others around here taught me....
It works and I have used it before. Dont have to remove the board, but you dont want to use this too often, and you have to use solid core wire.
1) Drill out the hole, board in chassy, use an eyelet, make the hole tight
2) insert eyelet in whole
3) [This is the trick] Strip off a little extra insulation from the wire than normal. Crimp a bit of the end at 90 degrees. Insert wire in eyelet, and seat crimp on underside edge. Apply another 90 degree crimp to wire on top of eyelet (often best to seat wire in eyelet firmly for this last bend with a matchstick or end of needlenose pliers, keep the underside from moving).
4) Solder eyelet in.
The end result is that lip created by the lower bend of the wire will hold the eyelet in. It forms a lip on the underside of the board.
Wallah! Perfect.
it really is a journey, and you just cant farm out the battle wounds
Re: Installing eyelets w/ board in chassis
How 'bout an alternative: Use a pot and mount it in the bottom of the chassis like the bias pot.Structo wrote:This is to install a balance trimmer on the PI.
The payoff on doing this mod may not be that immense but it is one of those things that is cumulative to a great sounding amp.
You could mount your bias trim on the back panel if you don't want to drill for the new PI balance pot.
great stuff-thanks
Thanks guys, all great suggestions. Not sure how I will do this. I am testing a bit on a blank out of the amp. I suppose a 10k bias pot is fine to use. I will pots once I get it done.
Cheers ange
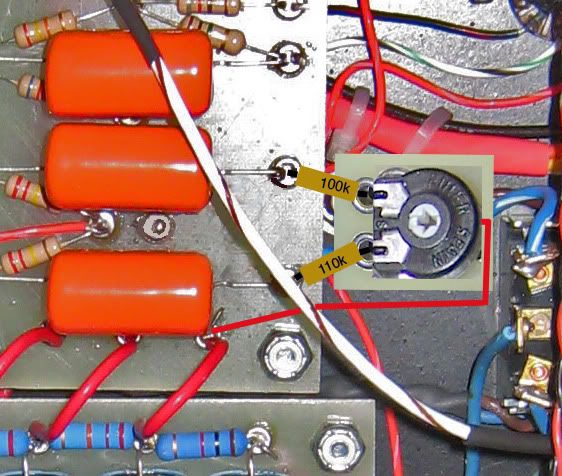
What about... I could use the daughter board idea on a single standoff, re-orient the resistors, pull the B+ link, run a new B+link, keep the pin 1& 6 connection at the old eyelets. Would require one small drilled hole.
BTW - I am currently running a 5751 ( more balanced tube ) with a 6 v spread and the quality is very good on OD.
One more question : for 6V6 do I stay with 82k/100k or make the swap to 100k/110k
[IMG:562:476]http://i260.photobucket.com/albums/ii9/ ... option.jpg[/img]
Cheers ange
What about... I could use the daughter board idea on a single standoff, re-orient the resistors, pull the B+ link, run a new B+link, keep the pin 1& 6 connection at the old eyelets. Would require one small drilled hole.
BTW - I am currently running a 5751 ( more balanced tube ) with a 6 v spread and the quality is very good on OD.
One more question : for 6V6 do I stay with 82k/100k or make the swap to 100k/110k
[IMG:562:476]http://i260.photobucket.com/albums/ii9/ ... option.jpg[/img]

Re: Installing eyelets w/ board in chassis
What about mounting a terminal strip using a screw/bolt through the empty hole? That's provided there's space in the chassis...
"I never practice my guitar. From time to time I just open the case and throw in a piece of raw meat." --Wes Montgomery