
Ok Structo or other guitar builders I really would appreciate some tips on finishing a guitar with stains, clear coating and polishing.
I recently bought a cheap Saga HT-10 PRS type kit. The build quality is better than the strat kit I build 20 years ago. I was going to go with a Grizzly but decided to mess this one up first and then attempt the Grizzly curly top next.
Mark
Kit Guitar finishing help needed
Moderators: pompeiisneaks, Colossal
Kit Guitar finishing help needed
You do not have the required permissions to view the files attached to this post.
Re: Kit Guitar finishing help needed
I built that same kit Mark.
If it is anything like mine the sealer that they slather all over it sucks.
The flamed maple top veneer had a bunch on mine and I tried to sand it off.
It is so hard that by the time I was getting through the sealer I was sanding through the veneer! That stuff is bullet proof!
Why they put sealer on the veneer I have no clue but it precluded any idea of doing a transparent finish I had in mind when I bought it.
It actually is not a bad playing/sounding guitar.
A great throw around for people to play when they come to visit.
The first thing you want to do is assemble it. Saga kits are famous for having out of alignment screw holes and such so it's a good idea to do a dry assembly of it to correct any mistakes.
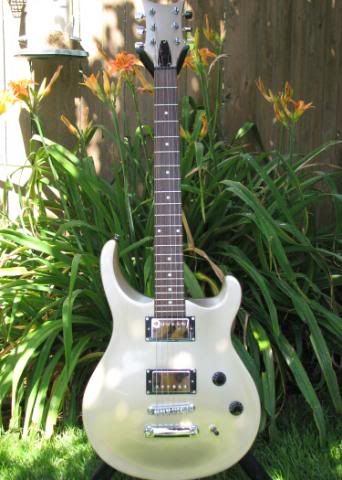
I ended up painting my guitar Shoreline Gold. In retrospect I wish I had chosen a different color as the Shoreline is not a true gold color.
Once you correct any misalignments and take the guitar back apart, I would sand it all with 320 to get rid of any bumps or scratches.
Now for the paint you can go cheap or high quality.
For cheap use Duplicolor acrylic lacquer found at some auto parts stores like Auto Zone.
Use their sandable primer and then spray your color coat.
The secret to a good color coat is to layer thin coats.
You want to make three passes for one coat.
A pass is a light spray over the entire body.
Do a series of these giving a couple hours dry time between until the color is uniform.
So you don't need to spray 16 oz of paint, just until it looks uniform.
When spraying your passes, start light then on the third pass try for a wet look, this will minimize orange peel in the paint which is a pebbly appearance that you will have to sand off if it is too bad.
Now for the clear coat you can use acrylic but it seems to take forever to get hard or you can use nitro clear lacquer.
You can buy Deft clear gloss nitro lacquer at most Home Depot's.
When you first spray over the Duplicolor you want to spray a few light misting coats. This will avoid any reaction between the two different types of paint.
Then you can go wetter and do three coats a day for three days.
You should spray two full cans on the body.
That sounds like a lot but it isn't because lacquer shrinks and you will also wet sand and polish it which removes some.
I also color matched the headstock on mine.
Heres a couple pictures.
[IMG:342:480]http://i23.photobucket.com/albums/b392/ ... 8852d4.jpg[/img]
[IMG:342:480]http://i23.photobucket.com/albums/b392/ ... 779654.jpg[/img]
[IMG:342:480]http://i23.photobucket.com/albums/b392/ ... 578bb6.jpg[/img]
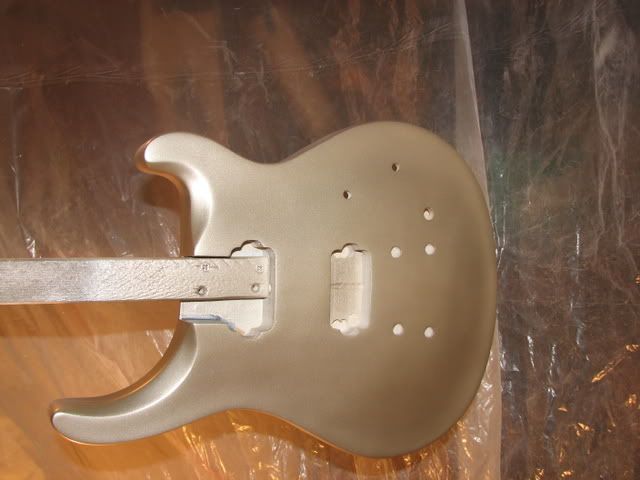
I like using a paint stick when I paint a body. I drill a hole at the end so I can hang the stick on a nail in my garage. Lacquer stinks so you want to leave it out in the garage for a couple days to gas off.
[IMG:640:480]http://i23.photobucket.com/albums/b392/ ... G_0145.jpg[/img]
If it is anything like mine the sealer that they slather all over it sucks.
The flamed maple top veneer had a bunch on mine and I tried to sand it off.
It is so hard that by the time I was getting through the sealer I was sanding through the veneer! That stuff is bullet proof!
Why they put sealer on the veneer I have no clue but it precluded any idea of doing a transparent finish I had in mind when I bought it.
It actually is not a bad playing/sounding guitar.
A great throw around for people to play when they come to visit.
The first thing you want to do is assemble it. Saga kits are famous for having out of alignment screw holes and such so it's a good idea to do a dry assembly of it to correct any mistakes.
I ended up painting my guitar Shoreline Gold. In retrospect I wish I had chosen a different color as the Shoreline is not a true gold color.
Once you correct any misalignments and take the guitar back apart, I would sand it all with 320 to get rid of any bumps or scratches.
Now for the paint you can go cheap or high quality.
For cheap use Duplicolor acrylic lacquer found at some auto parts stores like Auto Zone.
Use their sandable primer and then spray your color coat.
The secret to a good color coat is to layer thin coats.
You want to make three passes for one coat.
A pass is a light spray over the entire body.
Do a series of these giving a couple hours dry time between until the color is uniform.
So you don't need to spray 16 oz of paint, just until it looks uniform.
When spraying your passes, start light then on the third pass try for a wet look, this will minimize orange peel in the paint which is a pebbly appearance that you will have to sand off if it is too bad.
Now for the clear coat you can use acrylic but it seems to take forever to get hard or you can use nitro clear lacquer.
You can buy Deft clear gloss nitro lacquer at most Home Depot's.
When you first spray over the Duplicolor you want to spray a few light misting coats. This will avoid any reaction between the two different types of paint.
Then you can go wetter and do three coats a day for three days.
You should spray two full cans on the body.
That sounds like a lot but it isn't because lacquer shrinks and you will also wet sand and polish it which removes some.
I also color matched the headstock on mine.
Heres a couple pictures.
[IMG:342:480]http://i23.photobucket.com/albums/b392/ ... 8852d4.jpg[/img]
[IMG:342:480]http://i23.photobucket.com/albums/b392/ ... 779654.jpg[/img]
[IMG:342:480]http://i23.photobucket.com/albums/b392/ ... 578bb6.jpg[/img]
I like using a paint stick when I paint a body. I drill a hole at the end so I can hang the stick on a nail in my garage. Lacquer stinks so you want to leave it out in the garage for a couple days to gas off.
[IMG:640:480]http://i23.photobucket.com/albums/b392/ ... G_0145.jpg[/img]
Tom
Don't let that smoke out!
Don't let that smoke out!
Re: Kit Guitar finishing help needed
Thanks Tom, I knew you had experience in this area. Nice looking guitar Tom.
I did get instructions that isn't too bad and it does say both the body and neck are sealed and sanded ready for final finishing. It says you need to decide if you want natural finish or color finish. For natural it says go directly to clear coat instructions. That must be because of the sealer they use. So in other words no staining just choose a color and go for it.
Ok I will assemble first. I was planning on using all the electronics and tuning keys to see how good it all is. Did you upgrade?
Mark
Re: Kit Guitar finishing help needed
Tom if I need neck shims do I get them from Stew-mac or make them from thin material? How many mills thick are the shims?
Mark
Mark
Re: Kit Guitar finishing help needed
No I didn't end up upgrading anything.
I have several other guitars so I didn't feel the need.
I didn't shim the neck on mine but what I have used in the past on other bolt necks is pieces of business cards or other card stock.
Be sure to cut the two neck screws shorter because two of them are too long. Can't remember which two but I recall that part.
If you think the top is good enough for a transparent finish, you can mix liquid dyes with thinner or lacquer and make a toner and spray it on.
But you should apply a sanding sealer before that so it doesn't soak into any bare wood if there is any.
Saga put that sealer all over the top of mine which ruined it for a trans finish.
Be sure to pick up a quart of Naphtha solvent.
It is a good all around de-greaser and you should wipe down the body and neck before spraying anything to remove finger oils and other contaminants.
Tom
Don't let that smoke out!
Don't let that smoke out!

Re: Kit Guitar finishing help needed
Nice Stew!
So you went with a Warmoth body and neck?
I've done a couple stained guitars with binding and it can be a bitch.
Mine have plastic binding so the masking was a must. I tried scraping it the first couple times but I would either nick the wood or take too much material off.
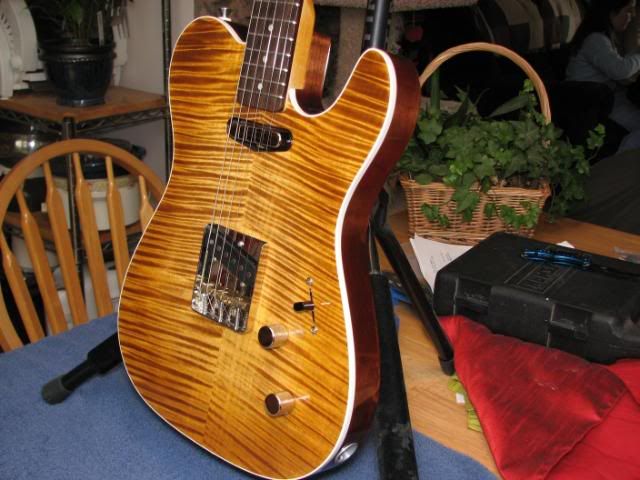
Here are a couple Tele's I've built.
Flamed maple top, alder back.
[IMG:640:480]http://i23.photobucket.com/albums/b392/ ... G_0042.jpg[/img]
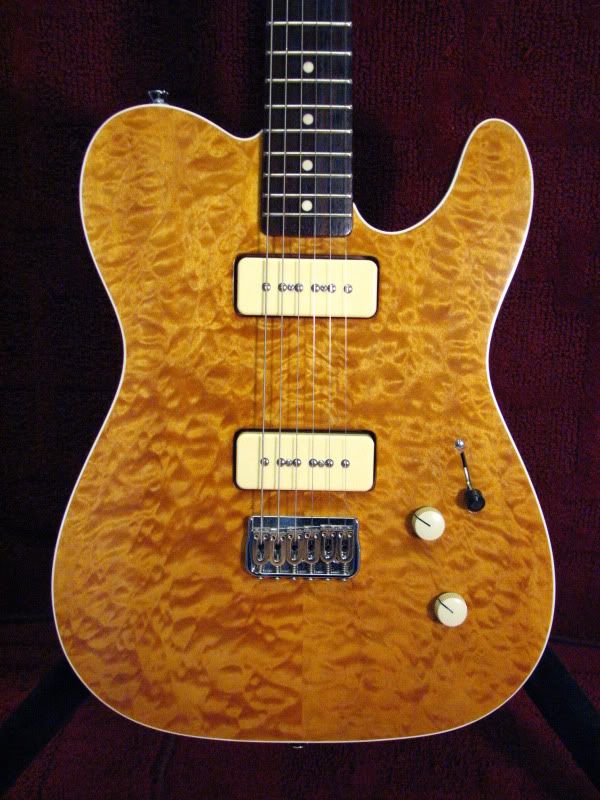
Quilt maple top, alder back.
I never could bond with teles, so I made this one with P90's.
I like it a lot.
[IMG:600:800]http://i23.photobucket.com/albums/b392/ ... G_0323.jpg[/img]
Click photos for a better detail.
I don't own a spray rig, all my guitars are done with spray cans.
So you went with a Warmoth body and neck?
I've done a couple stained guitars with binding and it can be a bitch.
Mine have plastic binding so the masking was a must. I tried scraping it the first couple times but I would either nick the wood or take too much material off.
Here are a couple Tele's I've built.
Flamed maple top, alder back.
[IMG:640:480]http://i23.photobucket.com/albums/b392/ ... G_0042.jpg[/img]
Quilt maple top, alder back.
I never could bond with teles, so I made this one with P90's.
I like it a lot.
[IMG:600:800]http://i23.photobucket.com/albums/b392/ ... G_0323.jpg[/img]
Click photos for a better detail.
I don't own a spray rig, all my guitars are done with spray cans.
Tom
Don't let that smoke out!
Don't let that smoke out!
Re: Kit Guitar finishing help needed
Okay you two just settle down Great looking guitars fellows.
I assembled it and had a ball playing this guitar, I like it.
They must have changed the kit because it had two long and two short screws for the neck plate. Instructions were terrible but I know how a guitar goes together so that was easy. The wiring is paint by number but long as heck and they forgot to give good instructions for the tail stop grounding wire darn fools but I figured it out.
I will read through your post Tom and Stew.
You do not have the required permissions to view the files attached to this post.
Re: Kit Guitar finishing help needed
For binding I would think pinstriping tape and flame layout tape would work for that available on line or at the local hotrod painters supply.
I have some painting experience but nothing to brag about so we'll see what I decide to do.
Mark
I have some painting experience but nothing to brag about so we'll see what I decide to do.
Mark
Re: Kit Guitar finishing help needed
Yes the pin striping vinyl tape is the best to use.
Glad everything fit correctly.
On my kit if I recall, the only holes that didn't line up were the tuner screw holes.
You may also want to change the headstock shape a bit to make it your own.
I kind of copied PRS but not exactly.
Glad everything fit correctly.
On my kit if I recall, the only holes that didn't line up were the tuner screw holes.
You may also want to change the headstock shape a bit to make it your own.
I kind of copied PRS but not exactly.
Tom
Don't let that smoke out!
Don't let that smoke out!
guitar finishing
I've finished a few instruments over the years. The process for each one was pretty much the same.
1) After final sanding/scraping any open grain woods (ex. mahogany) should be filled with a paste filler. The filler can have pigment added to it if desired. I use small amounts of artist grade oil paint. Figured woods can be sanded and scraped against the grain to intensify the figure and dyes can also be added. I usually use alcohol based aniline dyes but sometimes use amber shellac as well.
2) Build up layers of finish with the intension of sanding off the last layer applied. Continue the building up process until the surface is smooth and irregularities and surface grain is filled. Apply two final coats that will be polished off. If using colored finishes apply these until smooth then apply clear coats.
3) I usually let the finish cure for 3 weeks or more. If you can shine a couple black lights on it, front and back. This will help speed up the curing process.
4) Use 400-600 grit wet sand paper for surface prep between coats. Use light randomly circular motions and mist the surface with water. A very small amount of dish soap can be used in water solution if finish build up appears on paper surface. Before applying more coats clean surface and dry thoroughly. Use 0000 steel wool, white polishing paste, mcGuires polishing compound and Micro mesh for final polish. You can also use a buffing wheel if you have one of those and are skilled with it.
5) Another method used for exposing bindings is by fashioning a metal scraper to the dimensions of the binding desired and scraping away the finish exposing the wood or other binding material.
6) Finally, keep the work area as dust free as possible (positive pressure area). Humid conditions will also pose problems with most finishes, especially nitro lacquers.
I hope this adds to the discussion.
Re: Kit Guitar finishing help needed
Thanks Tom and Dano lots of great information and it is very much appreciated.
Mark
Mark
Re: Kit Guitar finishing help needed
Mark if you want to go the nitro lacquer route, Guitar ReRanch sells high quality nitro lacquer in spray cans.
They sell quite a few custom Fender colors as well as a few Gibson colors.
The white nitro primer he sells is the best I have used.
If going for a solid color, you can probably skip the grain fill and sealer coats since the body and neck are sealed with that nasty sealer.
So you would apply one coat of primer, let it dry overnight, sand with 400-600 then if it is smooth with no scratches or sand throughs, you can spray your color coat.
THe neat thing about nitro lacquer is that it melts into the previous coat so there is no recoating window to adhere to.
The wet sanding is probably where most newbies get into trouble.
The idea is to start with the finest grit wet paper that will cut and remove any orange peel.
So if 800 works that's fine. I have even started with 1000 grit when the peel was minimal.
Then you work up through the grits to 2000.
It's important to be sure you have removed the previous grits scratches before moving up a grit because it will be hard to do it with the finer grit.
Water can be used as a wetting agent but be warned if you get water into an exposed screw hole, it can swell the wood and split the finish.
A lot of first timers use baby oil for this, it lubes well and will not split the finish.
I use mineral spirits, it is harmless to the finish (nitro) and allows the paper to work well.
Stew Mac sells these great polishing pads that attach to a drill.
I have used these a lot but they are expensive.
Harbor Freight sells a foam pad kit for cars that works well for about half the price.
The Stew Mac pad. $14 each
[img:439:329]http://www.stewmac.com/catalog/images_1lg/3414_1lg.jpg[/img]
The Harbor Freight pads. $10
[img:370:370]http://www.harborfreight.com/media/cata ... e_3134.jpg[/img]
Tom
Don't let that smoke out!
Don't let that smoke out!
Re: Kit Guitar finishing help needed
As for polishing compounds, there are so many out there it can be overwhelming.
You can't go wrong with the 3M products but they way they describe them is confusing and also sometimes they are hard to find locally.
I had really good luck sanding up through 2000 then using the Stew Mac #4 Swirl remover and their pad.
Later I started using Meguiars Scratch X as the final polish which helped eliminate the very fine scratches that are hard to even see.
Here is a great chart documenting the various grades of abrasives in order from coarse to fine.
Oh and never ever get anything that contains silicone around a guitar you are finishing.
It can really contaminate the surface and cause all kinds of problems.

http://www.dano.pocketrubbish.com/detai ... tchart.htm
You can't go wrong with the 3M products but they way they describe them is confusing and also sometimes they are hard to find locally.
I had really good luck sanding up through 2000 then using the Stew Mac #4 Swirl remover and their pad.
Later I started using Meguiars Scratch X as the final polish which helped eliminate the very fine scratches that are hard to even see.
Here is a great chart documenting the various grades of abrasives in order from coarse to fine.
Oh and never ever get anything that contains silicone around a guitar you are finishing.
It can really contaminate the surface and cause all kinds of problems.
http://www.dano.pocketrubbish.com/detai ... tchart.htm
Tom
Don't let that smoke out!
Don't let that smoke out!
Re: Kit Guitar finishing help needed
Holy crap Tom if I get through this I am immediately starting on another guitar to stay in practice, thanks a lot.
Mark
Mark