
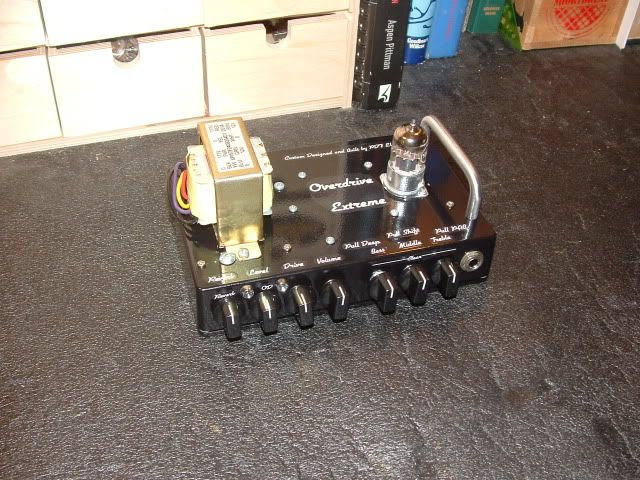
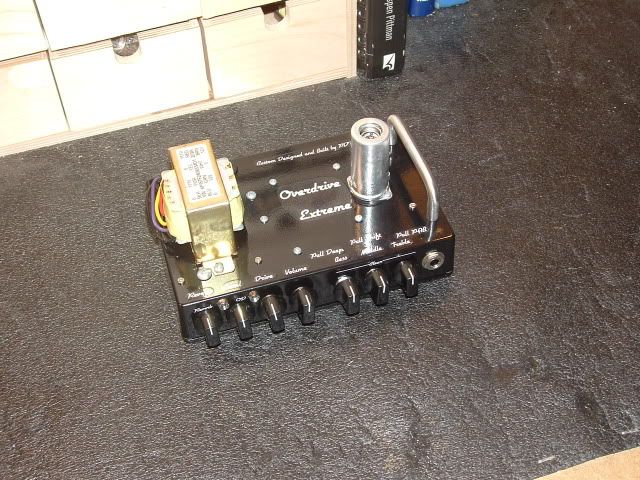
I like building little preamps, this is my latest, I call this one the Overdrive Extreme.
I am really proud of this one though. I’ve been working on it off and on since September. University kind of made it difficult to get a whole lot of work done on it at one time. I tried to work on it a bit on weekends I was home, redesign and tweaking the schem in lecture. It spent a lot of time on the breadboard during the year, tweaking it to my liking. I finished school last week so I finally got to wire it all up. I’m really happy with the end result.
Features:
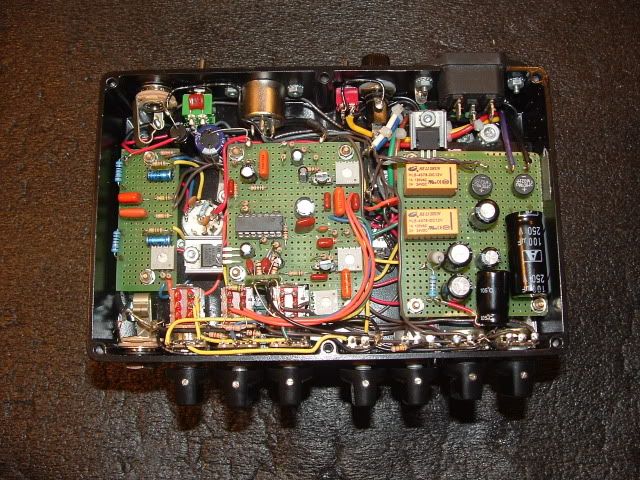
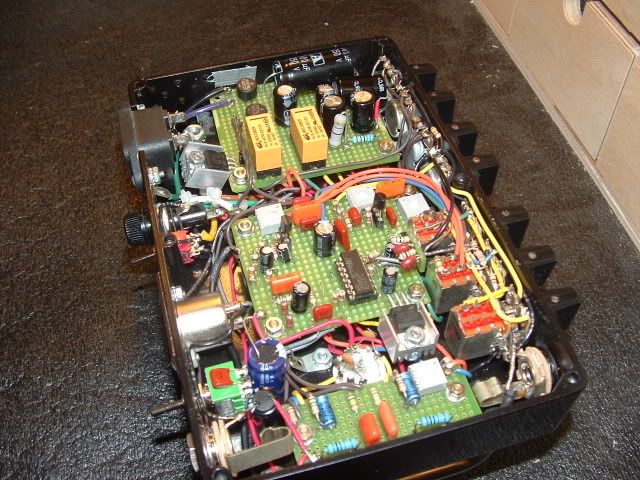
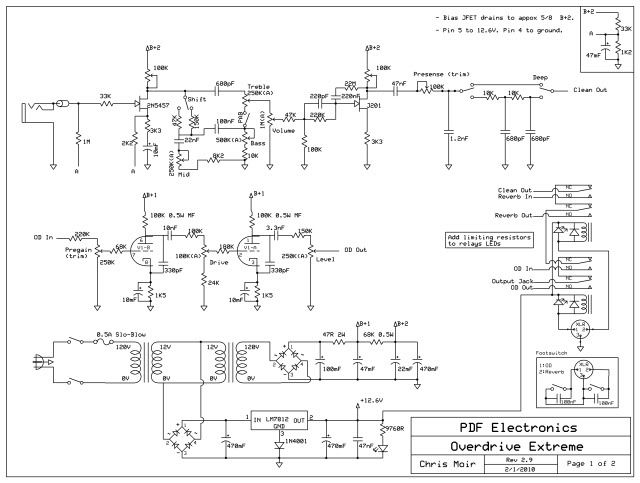
Clean Channel – the clean is run at 40V using two JFETs, so two gain stages. The circuit uses a tweaked Dumble tonestack. The tonestack is very flexible and can cover a wide range of tones though, so kinda unlike the typical stack. There is three switching options as well (push-pull pots).
Deep – very low rich bassy tone. A added low pass filter at the end of the clean channel is all it is.
Shift – changes the slope resistors for either classic clear tone or a more middy Marshall type tone.
PAB – preamp boost. This disconnects a portion of the tonestack and frees up a bunch of gain.
Finally after the tonestack there is a volume control for the clean channel. Also there is an internal Presence trimpot to tweak the high end. Very useful for getting that smooth warm clean tone but getting the clarity, ideal for switching between singles and humbuckers. The clean channel is set up so it stays clean and wont clip on it’s own. You can see this in the schem, look after the volume control.
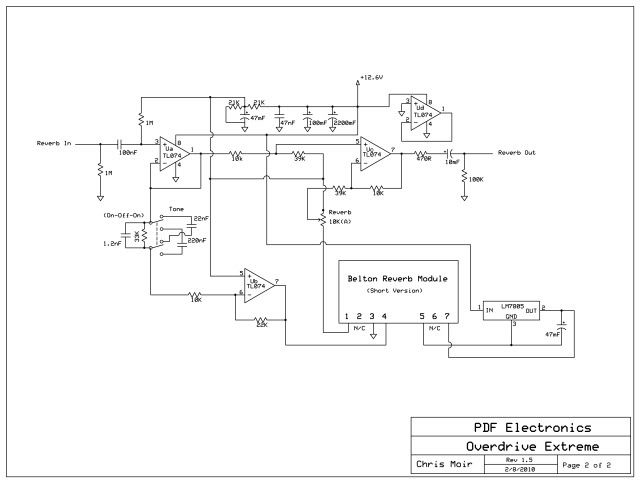
Reverb – the reverb uses the Belton reverb brick. The circuit that works around the brick uses a quad op-amp (TL074). I used the short module version of the brick, though there is lots of deep natural reverb on tap. I am not a fan of “over the top” reverb. It sounds really good with the only control being a Reverb Level pot. I also added a Reverb Tone switch on the back. It’s a three position switch. The switch affects the reverb tone’s high end. But when set in the middle position the reverb is set flat and makes the effect more subtle.
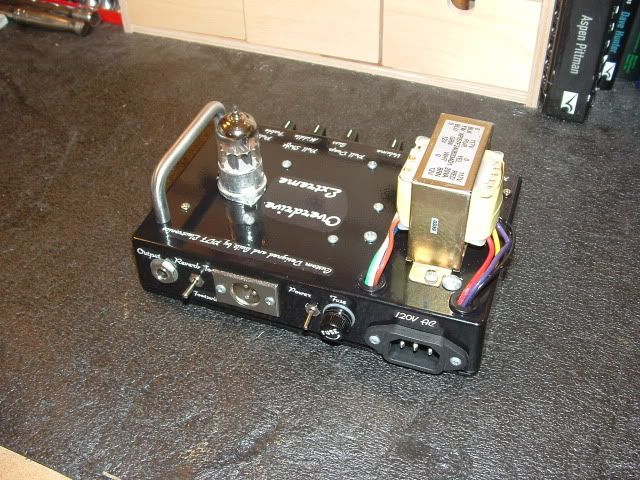
Overdrive Channel – the overdrive is provided by a single 12AX7 running around 150V. The circuit is a tweaked #124 style overdrive. Very smooth sounding with good compression, the circuit provides a great bluesy/jazz overdriven tone. There is an input gain trim pot inside to tweak for best sounding overdrive. That said I’m running that trimpot almost fully open. Other than that the typical Drive and Level control are present. The circuitry uses “low plate” topology. Spent a lot of time tweaking the plate/cathode resistors to my liking. Eventually settled on 100K/1K5 (“low plate”). Metal film ended up sounding best for the plate load resistors. I used mini Orange Drops for coupling, NOS Philips for bypass and ceramic for snubbers. With the PAB engaged the overdrive circuit is hit with a much hotter signal. That’s when the preamp really starts to sing. The sustain and harmonics are amazing with the added boost.
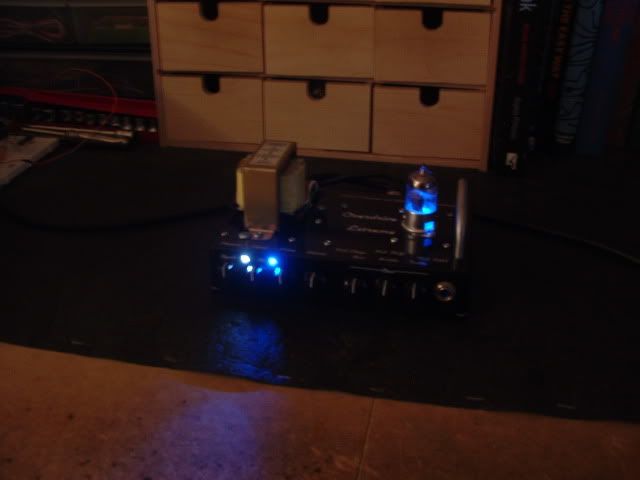
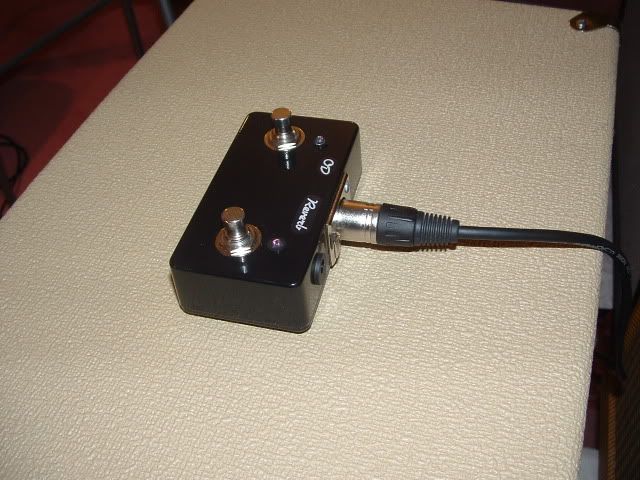
Both the overdrive and reverb are externally footswitchable. LEDs on the front of the preamp and on the footswitch tell whether or not the overdrive/reverb is on or not. This is done with two 12V relays. Another cool little thing is the tube glows blue when the preamp is turned on. I mounted a super bright blue 3mm LED in the tube socket to do this.
Very minimal noise coming from this unit. My grounding schem with lots of filtering really seems to keep the noise out. That was one thing I was worried about with such a tight build. It was a very tight fit in the enclosure but I made it all work. Minimal debugging needed actually. Only a bit of smoke and a few bugs to work out.
So overall a cool little preamp, with a ton of tones on tap. Hoping to record some clips soon. Soundclips will be the deciding facotor. All you Dumble tone gurus will have to tell me how close I am. Personally I think it nails the D tone.
Pics...
[IMG:640:480]http://img.photobucket.com/albums/v610/ ... s/Out1.jpg[/img]
[IMG:640:480]http://img.photobucket.com/albums/v610/ ... s/Out2.jpg[/img]
[IMG:640:480]http://img.photobucket.com/albums/v610/ ... s/Out3.jpg[/img]
[IMG:640:480]http://img.photobucket.com/albums/v610/ ... s/Glow.jpg[/img]
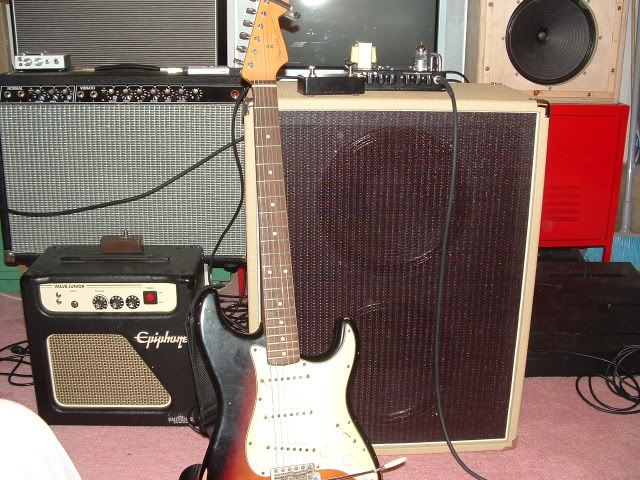
[IMG:640:480]http://img.photobucket.com/albums/v610/ ... s/Size.jpg[/img]
[IMG:640:480]http://img.photobucket.com/albums/v610/ ... Switch.jpg[/img]
[IMG:640:480]http://img.photobucket.com/albums/v610/ ... s/Gut1.jpg[/img]
[IMG:640:480]http://img.photobucket.com/albums/v610/ ... s/Gut2.jpg[/img]
Schem...
http://img.photobucket.com/albums/v610/ ... es/OD1.jpg
http://img.photobucket.com/albums/v610/ ... es/OD2.jpg
My Take on the Dumble sound, Executed Differently.
Moderators: pompeiisneaks, Colossal
-
David Root

- Posts: 3540
- Joined: Fri Aug 04, 2006 3:00 pm
- Location: Chilliwack BC
Re: My Take on the Dumble sound, Executed Differently.
Wow, and I thought my current build was crammed in there! Very interesting ideas, looks very well executed too.
If it sounds as good as that bloo glow looks, you got it made in the shade!
If it sounds as good as that bloo glow looks, you got it made in the shade!
Re: My Take on the Dumble sound, Executed Differently.
Very impressive indeed!
Re: My Take on the Dumble sound, Executed Differently.
This looks really great.I'm looking forward for the sound clips.


Re: My Take on the Dumble sound, Executed Differently.
CoolCool.. Clips please!!
" The psychics on my bench is the same as Dumble'"
-
gilgalad101
- Posts: 51
- Joined: Sun Aug 31, 2008 6:06 pm
- Location: South Carolina
Re: My Take on the Dumble sound, Executed Differently.
Aye!talbany wrote:CoolCool.. Clips please!!
Re: My Take on the Dumble sound, Executed Differently.
Nice
What are you running the preamp through?
What are you running the preamp through?
Tom
Don't let that smoke out!
Don't let that smoke out!
Re: My Take on the Dumble sound, Executed Differently.
I second what Tom asks. Also, curious as to why you went for Jfets in the first stage instead of a valve? Were you particularly wanting a clean clean pre amp? Nice work, by the way!!! 
Re: My Take on the Dumble sound, Executed Differently.
Thanks all!
The magic of tubes really comes when they clip imo. You could argue over this all day but I believe tubes are at their best when they are pushed. Since the clean channel was designed never to clip I saw no reason to use a tube. I used JFETs because they sound good, are similar to triodes in how they are setup and how they sound (for the most part), and they are small. The JFETs will never clip (unless hit with a super hot input signal) so they are just as good as a tube in my book. I could have used a tube but that would have taken extra space and really the benefits would not be worth it.
Currently I have the preamp running into the input of a 75W SS amp. I am using it there because it shows just how good the preamp is (this SS amp is a real shitter). I have also run it into the PI of many of my amps though (those would be tube).

Re: My Take on the Dumble sound, Executed Differently.
Beautiful work
At first glance it looks like a 12 - 0 - 12 transformer(or is it 24 - 0 - 24?) did you use a series of doublers to get the 150v?
At first glance it looks like a 12 - 0 - 12 transformer(or is it 24 - 0 - 24?) did you use a series of doublers to get the 150v?
Former owner of Music Mechanix
www.RedPlateAmps.com
www.RedPlateAmps.com
-
Guitarman18
- Posts: 454
- Joined: Tue Sep 04, 2007 9:32 pm
- Location: UK
Re: My Take on the Dumble sound, Executed Differently.
ChrisM,
Looks great. It would be amazing to be able to take something that small, out gigging.
Don't forget clips.
Cheers,
Paul.
Looks great. It would be amazing to be able to take something that small, out gigging.
Don't forget clips.
Cheers,
Paul.
Re: My Take on the Dumble sound, Executed Differently.
Two 120V primaries, two 12V secondaries. Wires back to back so 120--12--12--120. Tap of 12V for the heater in the middle, grab 120V at the end for HT. Check out the schem.heisthl wrote:Beautiful work
At first glance it looks like a 12 - 0 - 12 transformer(or is it 24 - 0 - 24?) did you use a series of doublers to get the 150v?
Will get clips asap.
Re: My Take on the Dumble sound, Executed Differently.
Genius!ChrisM wrote:Two 120V primaries, two 12V secondaries. Wires back to back so 120--12--12--120. Tap of 12V for the heater in the middle, grab 120V at the end for HT. Check out the schem.heisthl wrote:Beautiful work
At first glance it looks like a 12 - 0 - 12 transformer(or is it 24 - 0 - 24?) did you use a series of doublers to get the 150v?
Will get clips asap.
Former owner of Music Mechanix
www.RedPlateAmps.com
www.RedPlateAmps.com