
Whew! Solder wick and tiny iron tips to the rescue!
-Aaron
YAOB (yet another one-zero-two build)
Moderators: pompeiisneaks, Colossal
-
amplifiednation
- Posts: 2091
- Joined: Sun Dec 26, 2010 6:19 pm
- Location: Boston
- Contact:
Re: YAOB (yet another one-zero-two build)
I hope you didn't think this was going to be easy!!!
Good luck with that socket...you can always put throw away tubes in those sockets temporarily...same with the preamps!
Take your time and do it right...troubleshooting these circuits is no fun!!
Good luck with that socket...you can always put throw away tubes in those sockets temporarily...same with the preamps!
Take your time and do it right...troubleshooting these circuits is no fun!!
Amplified Nation
www.amplifiednation.com
@ampnation
www.amplifiednation.com
@ampnation
Re: YAOB (yet another one-zero-two build)
I did expect it to be a challenge and it's definitely living up to that. I'm really excited to play it though. I just wish I had more time to put into it. I get a bit over focused with projects like this and have a hard time putting them aside for other obligations and necessities (like sleep).amplifiednation wrote:I hope you didn't think this was going to be easy!!!
Good luck with that socket...you can always put throw away tubes in those sockets temporarily...same with the preamps!
Take your time and do it right...troubleshooting these circuits is no fun!!
I did get the socket cleared though and will definitely use throw away tubes to prevent that from happening again.
I'd like to give a big thanks to everyone on this forum. There's a tremendous wealth of knowledge shared here and that's truly a remarkable thing.
-Aaron
-
amplifiednation
- Posts: 2091
- Joined: Sun Dec 26, 2010 6:19 pm
- Location: Boston
- Contact:
Re: YAOB (yet another one-zero-two build)
You'll have a great amp when you are done!! I get a little engulfed with these too. In the end when you look back you won't be able to figure out why it took you so long. Then you'll remember the 2 hours you spent fishing a washer out from under the board to avoid having to break a solder joint
Amplified Nation
www.amplifiednation.com
@ampnation
www.amplifiednation.com
@ampnation
-
guitardude57

- Posts: 355
- Joined: Fri May 15, 2009 6:19 pm
- Location: Austin, TX
- Contact:
Re: YAOB (yet another one-zero-two build)
If you don't have a solder sucker... get one.
Just heat from the back a touch, and suck that out.
It is a good idea to keep a tube for each kind of socket specifically for soldering connections to sockets on all your builds, IE; a 12ax- and an octal, that you put in the socket then solder your leads.
This keeps the solder from running into where you don't want it.
Finish soldering, pull the tube and move to the next position, then solder that one up.
No muss, no fuss.
Remember, to only heat connections enough to get flow, and get the iron off of there.
Mike
I am never surprised and always amazed
I am never surprised and always amazed
Re: YAOB (yet another one-zero-two build)
Man I had a drop of solder get into a noval socket once and didn't know it until I went to install tubes.
I couldn't figure out why it wouldn't push in.
So I forced it in, but realized what had happened.
Good idea to keep some junk tubes around to keep in the sockets or some bases.
I couldn't figure out why it wouldn't push in.
So I forced it in, but realized what had happened.
Good idea to keep some junk tubes around to keep in the sockets or some bases.
Tom
Don't let that smoke out!
Don't let that smoke out!
Re: YAOB (yet another one-zero-two build)
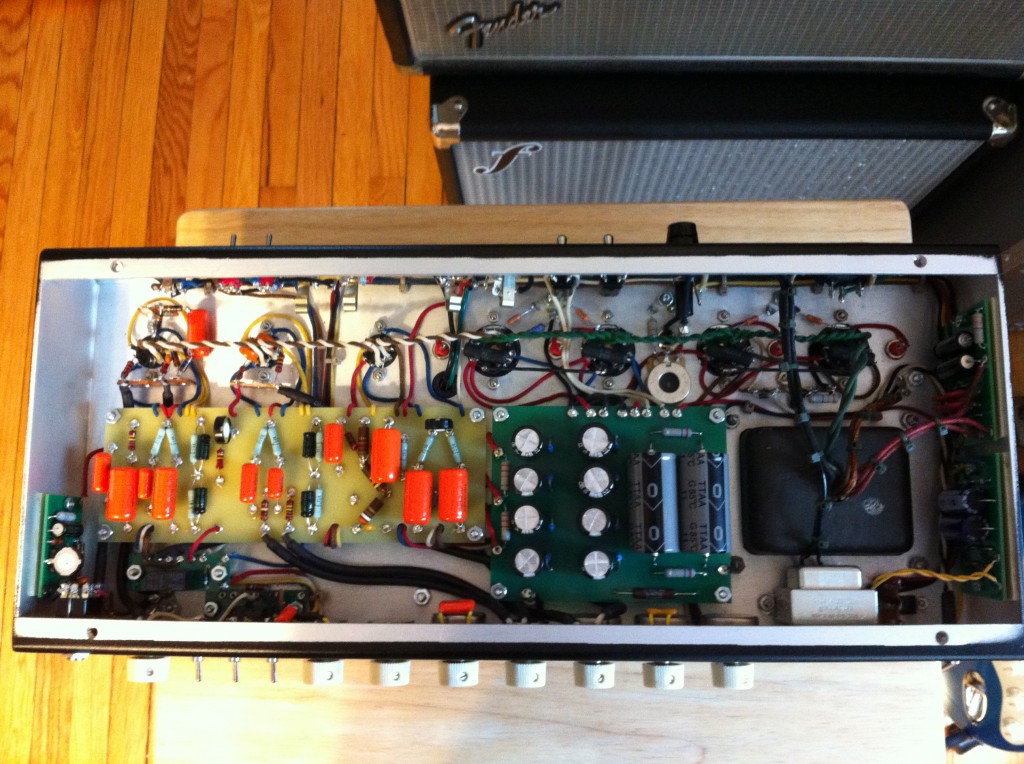
Whew! All wired up! Yay! Now I'm afraid to plug it in.  Is the lightbulb limiter / variac absolutely necessary? I don't have either, and I'm not sure if I have any old lightbulbs anywhere.
[img 764]http://www.aaronflynt.com/wp-content/up ... 24x764.jpg[/img]
[img764]http://www.aaronflynt.com/wp-content/up ... 24x764.jpg[/img]
[img764]http://www.aaronflynt.com/wp-content/up ... 24x764.jpg[/img]
[img764]http://www.aaronflynt.com/wp-content/up ... 24x764.jpg[/img]
[img764]http://www.aaronflynt.com/wp-content/up ... 24x764.jpg[/img]
-Aaron
[img
 764]http://www.aaronflynt.com/wp-content/up ... 24x764.jpg[/img]
[img
764]http://www.aaronflynt.com/wp-content/up ... 24x764.jpg[/img][img
764]http://www.aaronflynt.com/wp-content/up ... 24x764.jpg[/img][img
764]http://www.aaronflynt.com/wp-content/up ... 24x764.jpg[/img][img
764]http://www.aaronflynt.com/wp-content/up ... 24x764.jpg[/img]-Aaron

Re: YAOB (yet another one-zero-two build)
Aaron
looks good, nice job there
TM
looks good, nice job there
TM
-
martin manning

- Posts: 14308
- Joined: Sun Jul 06, 2008 12:43 am
- Location: 39°06' N 84°30' W
Re: YAOB (yet another one-zero-two build)
“You've got to ask yourself one question: 'Do I feel lucky?' Well, do ya punk?”aflynt wrote:Whew! All wired up! Yay! Now I'm afraid to plug it in.
It's definitely better to use a limiter of some kind. With no tubes installed you are at least a little safer, or maybe you could rig something up using a table lamp.
Re: YAOB (yet another one-zero-two build)
martin manning wrote:“You've got to ask yourself one question: 'Do I feel lucky?' Well, do ya punk?”aflynt wrote:Whew! All wired up! Yay! Now I'm afraid to plug it in.
Then again.......
http://www.youtube.com/watch?v=_VrFV5r8cs0
TM
Re: YAOB (yet another one-zero-two build)
Good points.ToneMerc wrote:martin manning wrote:“You've got to ask yourself one question: 'Do I feel lucky?' Well, do ya punk?”aflynt wrote:Whew! All wired up! Yay! Now I'm afraid to plug it in.
Then again.......
http://www.youtube.com/watch?v=_VrFV5r8cs0
TM
-Aaron
Re: YAOB (yet another one-zero-two build)
If you don't use a limiter device here is a basic startup method..Off the top of my head!
I go over the amp with a high powered magnifying glass and inspect each solder joint..For 2 reasons .. Cold solder joints and to make sure the solder adhered properly to the wire or component leads..(optional)
2..Double check all my ground connections on the PS filters,bias supply grounds, PI and, pre amp cathode caps
3..Disconnect GNFB from the speaker jack
4..Pull all the tubes
4..I'll attach my meter leads with alligator clips one to ground one to plate node on the PS (set to DC)
5.. Plug the amp into my variac
6..Slowly bring up the voltage (watching the plate voltage) to 120v AC and check filament voltage
7...Take my 2nd meter and go down the PS nodes (including bias supply) checking each supply node voltage (including FET and relay supply)
8...If everything checks out then check the -bias supply voltage for good range on the type of output tubes you are using (-30 to -60 is about what I shoot for)
9...Set the negative voltage to max (putting the tubes into cut off)
10..Bring the amp down (discharge the PS caps if you like)
11..Install all the tubes with bias probes and plug the amp into a load
12...Bring the amp back up and watch that the probes/ meter reads 0 (not conducting) and all the filaments are lit..
13.. Bring down the - voltage on the -bias to 60% max plate dissipation and check for proper tube matching
14...Go down the line and check screens (1-2 volts lower) and each plate and cathode voltage on the PI and preamp..(cathode voltage on the PI should be in the 50v range)
15...At this point you want to let the amp sit and adjust for tube drift(especially 34's)..I'll kill some time here and Plug a cable in to the return jack with another pre amp to make sure it's not dead..(If I have a lator laying around I'll use it)
16...Disconnect the loop and check the front end on both clean OD and PAB for sound
17..At this point the tubes have drifted some so a re-bias will be needed...Kill the amp pull the probes and re-install the tubes..( Try not to play the amp to long and at high volumes with the probes attached)
18..Disconnect the variac, turn the amp back on go through all the channels and check all the pre amp controls and switching ( I will usually double check all the voltages as well)
20.. Touch the NFB wire to the speaker jack you are getting your NFB from, (I use an alligator clip) if it howls reverse plate leads on the OPT primary..re-attach and check presence control for good range..
21.. At this point I'll play and enjoy my latest creation and let it cook for at least 1/2 hour or so..
22.. At this point I will pull my test glass (pre amp tubes)..The ones I know works, and either roll through the new glass or install my NOS glass if I have some I want to use..
23..Balance PI and check the FET bias and set OD trimmer
24..I'll usually play the amp and cook it for at least 8 hours 16 or longer.. for a touring player and attach a loop at some point during this time. If the amp is an HRM I will set T/M/B (with PAB onand presence set at 12:00) and ALWAY'S re-check bias before putting it in the cab and sending it out..
That's all you have to do..
I generally play the amp a few days with different guitars and sometimes different cabs before I do any type of drastic voice changes!!
Hope This Helps!!
Perhaps this can be looked over and modified (if needed)and posted as a sticky in the files section..
Tony
Last edited by talbany on Mon Jul 23, 2012 3:53 pm, edited 14 times in total.
" The psychics on my bench is the same as Dumble'"
Re: YAOB (yet another one-zero-two build)
Woah! Thanks for the gold mine of detailed knowledge! That helps immensely.
-Aaron
-Aaron
Re: YAOB (yet another one-zero-two build)
Without tubes I'm getting the following voltages:
B+2 - 446V
B+3 - 438V
B+4 - 370V
B+5 - 364V
Bias Range - -56V to -40V
I'm not quite sure if that's right or not unloaded. I'm guessing the bias voltage range is going to need to be changed.
-Aaron
B+2 - 446V
B+3 - 438V
B+4 - 370V
B+5 - 364V
Bias Range - -56V to -40V
I'm not quite sure if that's right or not unloaded. I'm guessing the bias voltage range is going to need to be changed.
-Aaron
Re: YAOB (yet another one-zero-two build)
Plates should be labeled B+1..Need to see that one!!
Screens B+2
PI B+3
OD B+4
Clean/FET B+5
Is this a high or low plate..
Can you revise your voltages..
Your bias supply range resistor (on the pot) might need to be adjusted..
I have to run but others can help you from here!!
Good Luck!
Tony
Screens B+2
PI B+3
OD B+4
Clean/FET B+5
Is this a high or low plate..
Can you revise your voltages..
Your bias supply range resistor (on the pot) might need to be adjusted..
I have to run but others can help you from here!!
Good Luck!
Tony
Last edited by talbany on Sat Jul 21, 2012 10:39 pm, edited 1 time in total.
" The psychics on my bench is the same as Dumble'"