Cube 1936 = finger joint insanity
Posted: Mon May 23, 2016 2:38 am
A few years ago I set out to build the smallest 2x12 cab ever. I was deep in the evil clutches of the lunchbox amp mania and smaller was always better. I miscalculated the magnet depth and rather than grind or mill a 1/4" bevel on ceramic magnets I choose to put 10" speakers in. The cab sounded fine with some batting. The other feature of this cab was I wanted to finger joint all four sides but I couldn't make the corner geometry work. So I scrapped that design feature. In retrospect that was a fortunate failure as my jig at the time was so not up to the task.
Fast forward to the present. Now a 50 watt+ Marshall slut and in love with the 1936 cab having built two I decided it was time to revisit the cube. Not for the small size but to replicate the internal volume of the 1936 to see if the speaker orientation would make a difference. The other benefit was I figured out with the help of Legos [I'm storing my now teen aged son's stash] was how to make the corner geometry work with finger joints - use a corner block.
The initial cab is pine with the option of building a pretty one later - that plan has been scrapped as you will see below. The corners will be walnut and the leading edge will be double thickness leopard wood with the traditional 1" round that Marshall uses. Luckily I had built a new finger joint jig for the last curly maple cab as this cab would test the consistency of jigs and cutting techniques severely. I did have to build a new cross cut sled so damn big I named it sledzilla as it covers the top of my saw.
There are 110 joints [one of the reasons I scrapped a pretty wood version] and it was a marathon cutting session. I marked the bejeepers out of the four sides to ensure I didn't miss cut - so tired of going to the wood store for more. I have always enjoyed cutting / sanding pine works like butter. I only had one joint that was about .010" off and required a bit of wacking to encourage it to play nice.
[img 685]http://i166.photobucket.com/albums/u119 ... ds7ihw.jpg[/img]
[img685]http://i166.photobucket.com/albums/u119 ... tb9oyh.jpg[/img]
[img685]http://i166.photobucket.com/albums/u119 ... 5aqnap.jpg[/img]
Angling the baffles back a 2° was fun with a center post.
[img685]http://i166.photobucket.com/albums/u119 ... nqyj0f.jpg[/img]
[img685]http://i166.photobucket.com/albums/u119 ... z6cm0j.jpg[/img]
The grill is angled and required a jig to hold the frame straight as the grill cloth was stretched and stapled - and unstapled and restapled and then unstapled and restapled.
[img685]http://i166.photobucket.com/albums/u119 ... bfjf93.jpg[/img]
Working from the sides instead of the ends yielded a result I can live with.
[img685]http://i166.photobucket.com/albums/u119 ... tvylc8.jpg[/img]
A bit of oil and a pair of Jim's magnificent Scumback J75LD's and it was ready to play. Took it to a jam session last night and it sounded like a wide dispersion 1936 - no weird artifacts or frequency loss. Sounded great with a JMP 2204 and magnificent with a Satellite Barracuda.
[img685]http://i166.photobucket.com/albums/u119 ... khlwr5.jpg[/img]
I haven't attached a handle yet as I'm not sure the best balance spot is. One side bummer - it's tall enough that it won't fit under my pickup bed cover when it is closed.
Russ
Fast forward to the present. Now a 50 watt+ Marshall slut and in love with the 1936 cab having built two I decided it was time to revisit the cube. Not for the small size but to replicate the internal volume of the 1936 to see if the speaker orientation would make a difference. The other benefit was I figured out with the help of Legos [I'm storing my now teen aged son's stash] was how to make the corner geometry work with finger joints - use a corner block.
The initial cab is pine with the option of building a pretty one later - that plan has been scrapped as you will see below. The corners will be walnut and the leading edge will be double thickness leopard wood with the traditional 1" round that Marshall uses. Luckily I had built a new finger joint jig for the last curly maple cab as this cab would test the consistency of jigs and cutting techniques severely. I did have to build a new cross cut sled so damn big I named it sledzilla as it covers the top of my saw.
There are 110 joints [one of the reasons I scrapped a pretty wood version] and it was a marathon cutting session. I marked the bejeepers out of the four sides to ensure I didn't miss cut - so tired of going to the wood store for more. I have always enjoyed cutting / sanding pine works like butter. I only had one joint that was about .010" off and required a bit of wacking to encourage it to play nice.
[img
 685]http://i166.photobucket.com/albums/u119 ... ds7ihw.jpg[/img]
[img
685]http://i166.photobucket.com/albums/u119 ... tb9oyh.jpg[/img]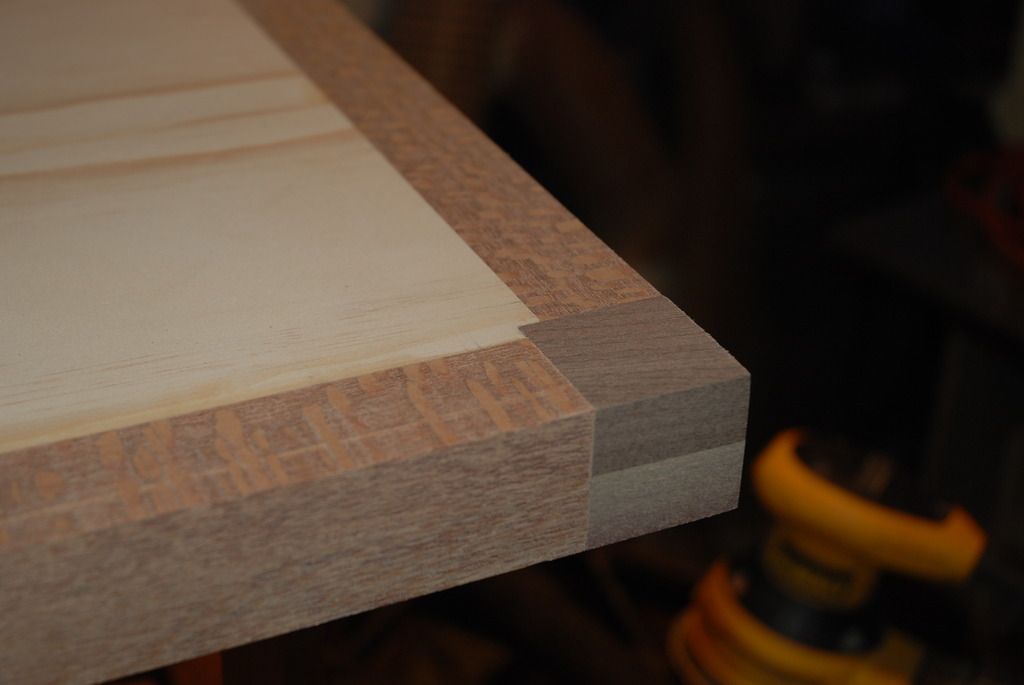
[img
685]http://i166.photobucket.com/albums/u119 ... 5aqnap.jpg[/img]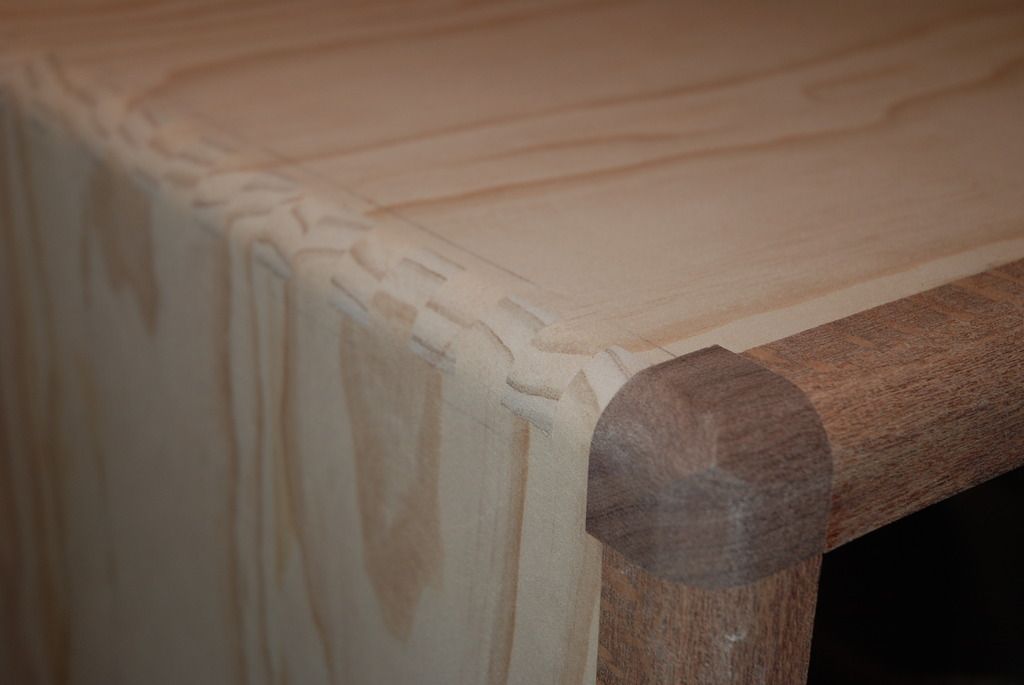
Angling the baffles back a 2° was fun with a center post.
[img
685]http://i166.photobucket.com/albums/u119 ... nqyj0f.jpg[/img]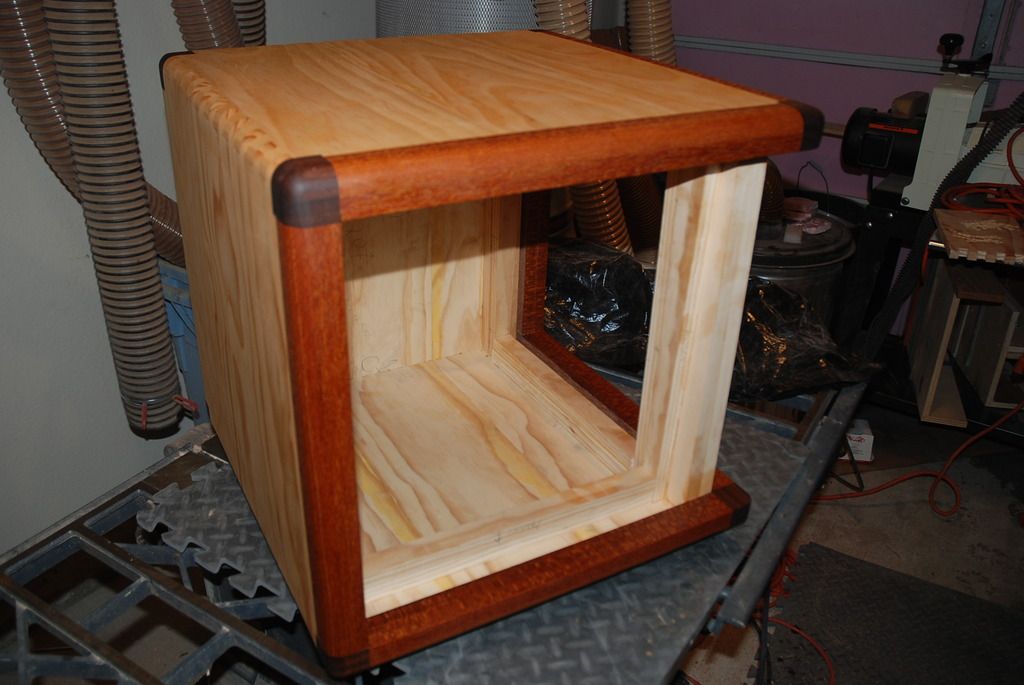
[img
685]http://i166.photobucket.com/albums/u119 ... z6cm0j.jpg[/img]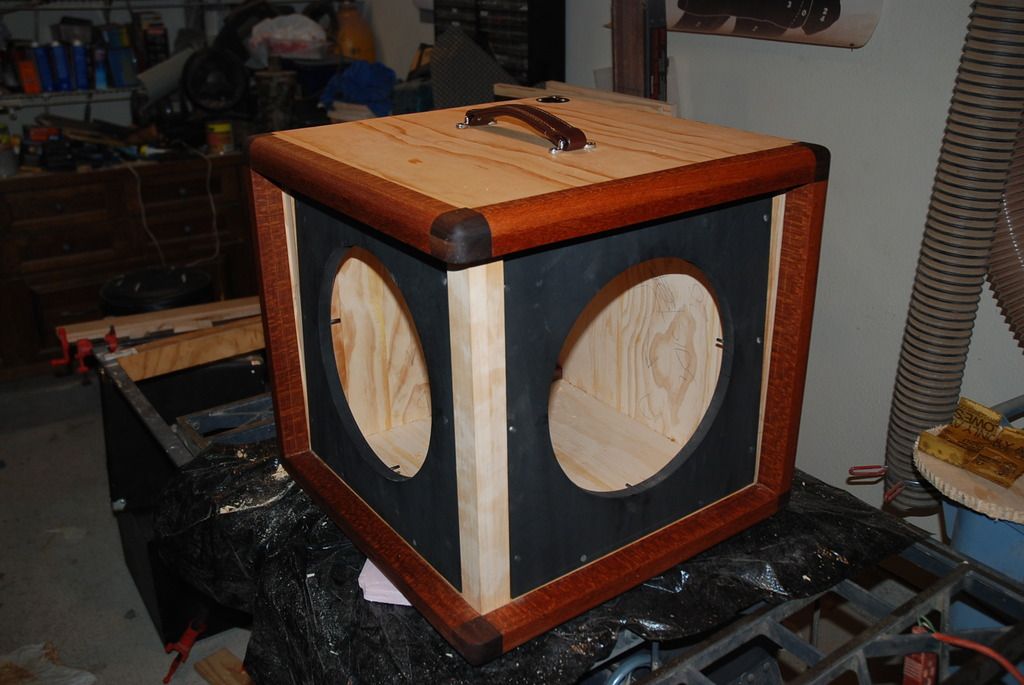
The grill is angled and required a jig to hold the frame straight as the grill cloth was stretched and stapled - and unstapled and restapled and then unstapled and restapled.
[img
685]http://i166.photobucket.com/albums/u119 ... bfjf93.jpg[/img]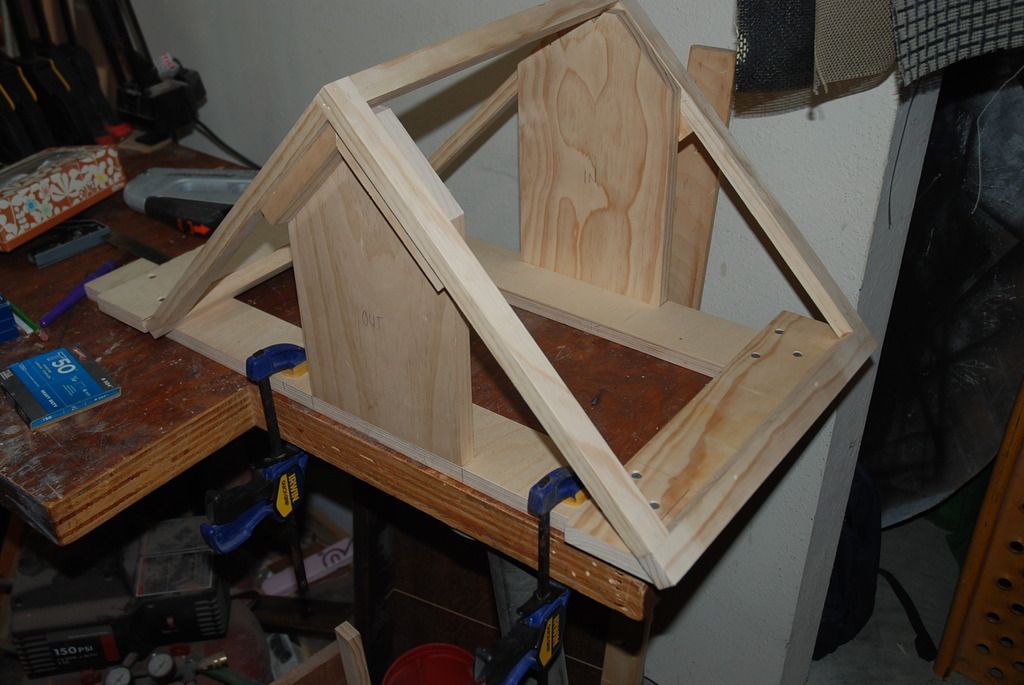
Working from the sides instead of the ends yielded a result I can live with.
[img
685]http://i166.photobucket.com/albums/u119 ... tvylc8.jpg[/img]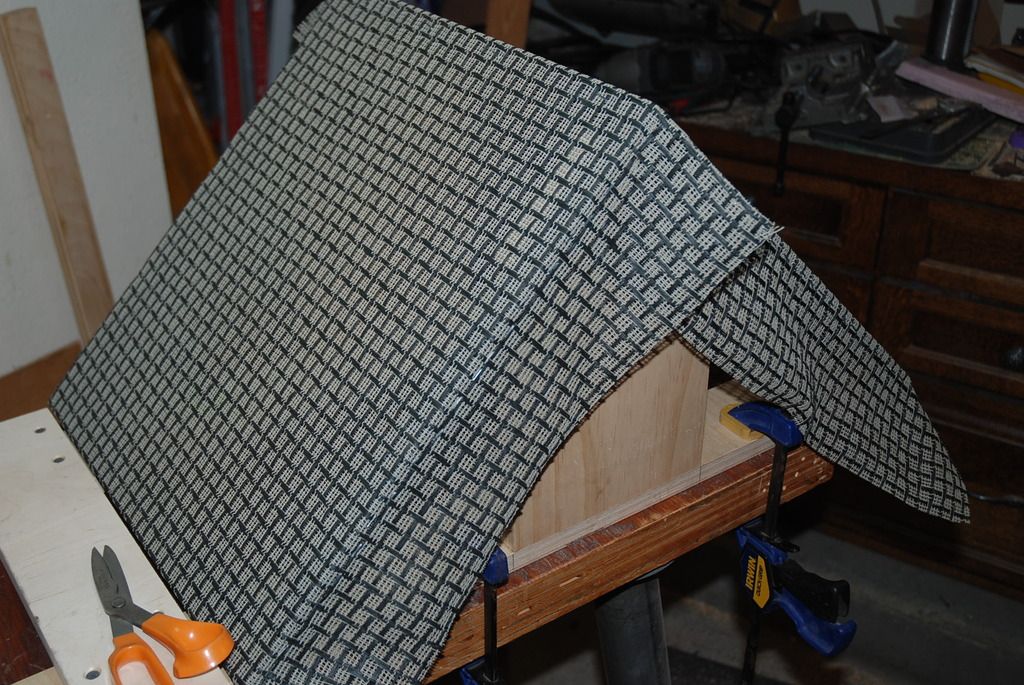
A bit of oil and a pair of Jim's magnificent Scumback J75LD's and it was ready to play. Took it to a jam session last night and it sounded like a wide dispersion 1936 - no weird artifacts or frequency loss. Sounded great with a JMP 2204 and magnificent with a Satellite Barracuda.
[img
685]http://i166.photobucket.com/albums/u119 ... khlwr5.jpg[/img]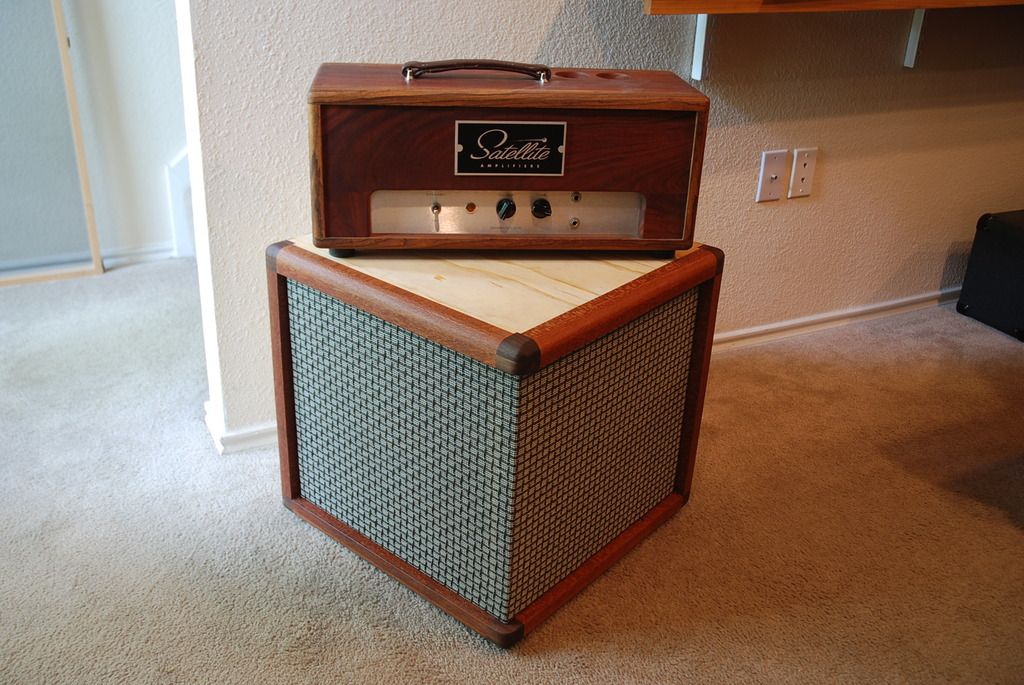
I haven't attached a handle yet as I'm not sure the best balance spot is. One side bummer - it's tall enough that it won't fit under my pickup bed cover when it is closed.
Russ